Meta Ads, Facebook और Instagram के पीछे काम करने वाला विज्ञापन सिस्टम है। यह गाइड Meta Ads और Ads Manager के संबंध, campaign बनाने से creative optimization तक तीन चरणों की प्रक्रिया और टीमों द्वारा कई ad accounts को नियमों के अनुरूप प्रबंधित करने के तरीकों को समझाती है।
Facebook या Instagram खोलते ही लगभग हर दिन कई तरह के विज्ञापन दिखाई देते हैं। Cross-border e-commerce और independent stores से लेकर app promotion तक, इन विज्ञापनों में से अधिकांश एक ही सिस्टम — Meta Ads — से आते हैं। विदेशों में पहली बार advertising शुरू करने वाले कई लोगों को लगता है कि ad account खोलते ही काम शुरू हो जाएगा। लेकिन वास्तविक उपयोग में जल्दी ही सवाल सामने आते हैं: campaign कैसे बनाएं, audience कैसे चुनें, budget कैसे तय करें, और Meta Ads तथा Facebook Ads के बीच आखिर संबंध क्या है?
Meta Ads केवल “विज्ञापन पोस्ट करने वाला backend” नहीं है, बल्कि ad creation, audience management, data analysis और performance optimization को कवर करने वाला पूरा advertising platform है। इसकी delivery logic समझने से अनावश्यक गलतियाँ कम होती हैं और बाद में ads optimize करना तथा budget scale करना आसान हो जाता है।
Meta Ads क्या है?
Meta Ads, Meta (पहले Facebook) का आधिकारिक advertising platform है, जो businesses, brands, creators और individual advertisers को Meta के कई products पर विज्ञापन चलाने की सुविधा देता है।
इसकी सबसे बड़ी विशेषता है एक बार बनाएं, कई channels पर distribute करें: एक campaign को Facebook, Instagram, Messenger और Audience Network पर एक साथ चलाया जा सकता है। Advertiser को हर platform पर अलग ad बनाने की जरूरत नहीं होती। Meta Ads Manager में एक बार campaign बनाने के बाद system advertising objective के आधार पर इसे अलग-अलग placements पर automatically distribute कर सकता है, जिससे centralized management और optimization संभव होता है।
Meta Ads Manager क्या है?
सीधे शब्दों में, Meta Ads पूरा advertising system है, जबकि Ads Manager उसे manage करने और ads चलाने का आधिकारिक backend है। चाहे Facebook ads बनानी हों या Instagram ads, setup, publishing और बाद की optimization Ads Manager के जरिए होती है।
Advertiser के लिए Ads Manager केवल “ad publish करने” का tool नहीं, बल्कि पूरे advertising lifecycle का management center है — ad creation, budget setting, audience selection, data analysis और delivery optimization सभी यहीं होते हैं।
Access: Ads Manager का आधिकारिक address
adsmanager.facebook.comहै। इसे Meta Business Suite (business.facebook.com) के बाएं menu में “All tools” से भी खोला जा सकता है।
Meta Ads Manager से विज्ञापन कैसे चलाएं?
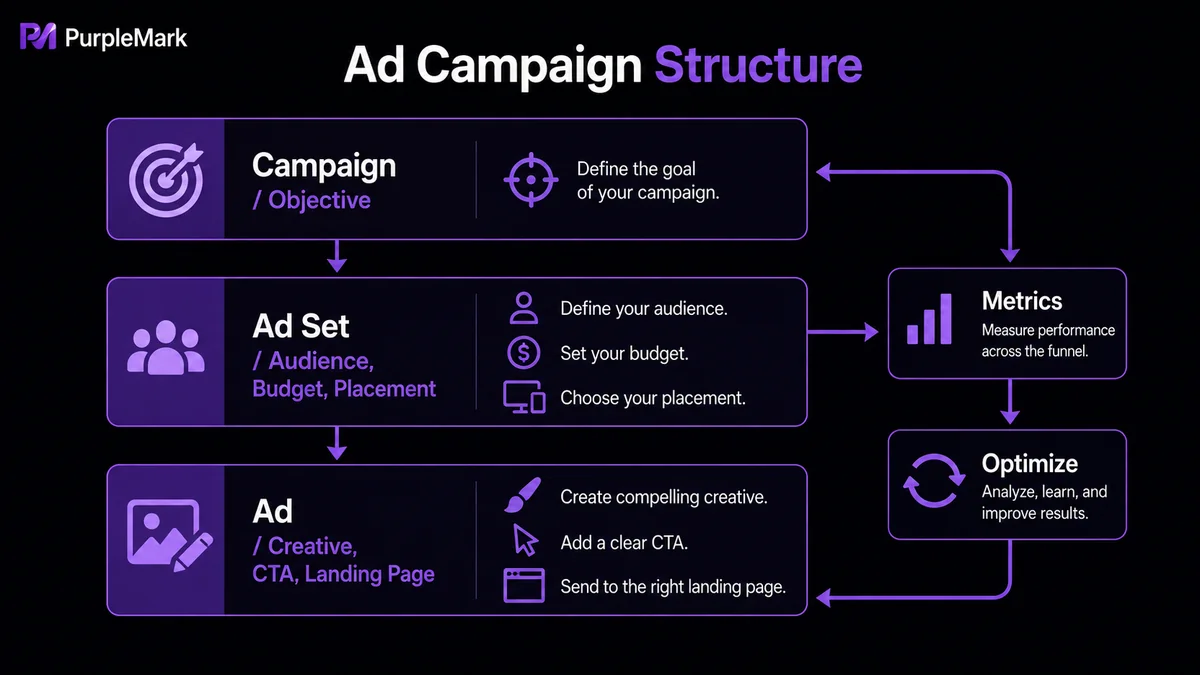
Advertising workflow को तीन मुख्य चरणों में बांटा जा सकता है: “क्यों advertise करना है” स्पष्ट करें, “किसे और कहां दिखाना है” तय करें, और “user क्या देखेगा” तैयार करें।
चरण 1: Campaign बनाएं — Advertising objective तय करें
Ad बनाते समय Ads Manager सबसे पहले Campaign Objective चुनने के लिए कहता है। Objective यह तय करता है कि system किन प्रकार के users को ad प्राथमिकता से दिखाएगा, इसलिए इसे पसंद के आधार पर नहीं बल्कि वास्तविक business need के अनुसार चुनना चाहिए। सामान्य objectives में शामिल हैं:
- Sales: e-commerce conversions, purchases और add-to-cart actions.
- Leads: forms, inquiries और potential customer information collect करना.
- Traffic: website या landing page पर clicks लाना.
- Engagement: post likes, Page follows और Messenger/WhatsApp conversations.
- Awareness: brand exposure और reach बढ़ाना.
अगर Shopify store का मुख्य लक्ष्य products बेचना है, तो आम तौर पर Sales चुना जाता है; SaaS company के लिए Leads अधिक उपयुक्त हो सकता है; और नया brand पहले Awareness या Traffic से शुरुआती audience बनाकर बाद में धीरे-धीरे conversions optimize कर सकता है।
चरण 2: Ad Set सेट करें — “किसे और कहां दिखाना है” तय करें
यही चरण वास्तव में तय करता है कि ad कैसे deliver होगा और आम तौर पर सबसे ज्यादा optimization की जरूरत यहीं होती है। पहले conversion location चुनें — website, app, Messenger या WhatsApp — फिर daily budget या total budget तथा delivery schedule सेट करें।
इसके बाद audience setup आता है। Basic targeting में country, region, age, gender और language शामिल हैं, और इनके साथ interests, behaviors, occupation तथा अन्य conditions जोड़े जा सकते हैं। पर्याप्त data मिलने के बाद Custom Audience और Lookalike Audience का उपयोग किया जा सकता है। Custom Audience website visitors, buyers या email lists के आधार पर remarketing के लिए उपयोग होता है, जबकि Lookalike Audience high-value customers जैसी विशेषताओं वाले नए users खोजता है। पूरी तरह zero से targeting शुरू करने की तुलना में इससे stable conversions मिलना अक्सर आसान होता है।
Placements के लिए beginners को हर option manually चुनने की जरूरत नहीं है। Advantage+ placements के जरिए system historical data के आधार पर Facebook, Instagram, Messenger, Audience Network और बेहतर-performing placements पर ads automatically distribute कर सकता है। Manual changes — जैसे केवल Instagram Reels पर चलाना — तब अधिक उपयोगी हैं जब stable data मिल जाए या साफ दिखाई दे कि कोई specific placement बेहतर perform कर रहा है।
चरण 3: Ad बनाएं — “User क्या देखेगा” तय करें
एक अच्छा Meta ad आम तौर पर image या video creative, ad headline, primary text, landing page link और call-to-action button (CTA) शामिल करता है। Single image, video, Carousel, Collection, Reels और Stories जैसे formats supported हैं।
कई ads की click-through rate कम होने का कारण delivery setting नहीं बल्कि creative का शुरुआती कुछ seconds में ध्यान न खींच पाना होता है। सभी product features को एक image में भरने के बजाय एक सबसे मजबूत selling point पर जोर दें — limited-time discount, core feature या user की सबसे बड़ी समस्या। Ad में जो promise किया जाए, वही landing page पर भी दिखाई देना चाहिए। सभी ads को homepage पर भेजना भी avoid करें, क्योंकि इससे unnecessary drop-off हो सकता है।
इसके अलावा, केवल एक creative set तैयार न करें। Mature teams कई images, videos और copy combinations को एक साथ launch करती हैं, system को creative performance automatically test करने देती हैं और फिर उच्च click-through व conversion rates वाले versions रखती हैं, बजाय एक ही ad को बार-बार बदलने के। Publish होने के बाद ad review से गुजरता है; live होने के बाद click-through rate, conversion rate और customer acquisition cost को लगातार track करके data के आधार पर audience, budget और creative optimize करें।
Advertising teams कई Meta ad accounts को compliant तरीके से कैसे manage करें?
कई individual sellers के लिए एक ad account पर्याप्त होता है, लेकिन multiple brands, agency campaigns या कई country markets को एक साथ operate करने पर accounts की संख्या स्वाभाविक रूप से बढ़ती है। यह legitimate business need है: कई teams अलग brands, product lines या country markets को अलग ad accounts में रखती हैं, ताकि reporting और budget control आसान हो। वे operational risk को distribute करने के लिए भी multiple accounts तैयार रख सकती हैं, ताकि review या risk controls के कारण एक account restricted होने पर पूरा advertising operation न रुके। Agencies में एक operator द्वारा कई clients के Business Manager और ad accounts एक साथ manage करना भी सामान्य है।
Accounts बढ़ने पर environment linkage महत्वपूर्ण विषय बन जाता है। Meta browser fingerprints (User-Agent, Canvas, WebGL, Cookie आदि), IP addresses और network environment का उपयोग करके accounts के बीच संबंध पहचान सकता है। यदि कोई account rule violation के कारण suspend हो जाए, तो उसी environment में उपयोग किए गए अन्य accounts पर भी असर पड़ सकता है। निम्न स्थितियां linkage risk बढ़ा सकती हैं:
- एक ही Chrome में multiple ad accounts login करके बार-बार accounts switch करना;
- Cookie, cache और local-storage data को mix करना;
- कई accounts द्वारा एक ही proxy IP share करना या IP बार-बार बदलना;
- सभी accounts पर बिल्कुल समान browser fingerprint parameters इस्तेमाल करना।
जो teams लंबे समय तक कई BM या ad accounts operate करती हैं, उनके लिए industry में “एक account, एक isolated environment” approach अधिक recommend की जाती है, ताकि प्रत्येक account का अलग login environment हो। आम तौर पर इसमें शामिल है:
- Independent browser environment: प्रत्येक account fixed browser environment उपयोग करे और Cookie, local storage तथा login state अलग-अलग save हों, बजाय एक ही Chrome profile share करने के।
- Stable network environment: हर account लंबे समय तक fixed proxy IP से जुड़ा रहे, बेहतर है कि actual operating market के अनुरूप हो, और regions को बार-बार switch न किया जाए।
- Long-term consistent fingerprint: multiple accounts को लंबे समय तक बिल्कुल समान device characteristics share न करने दें और environment बार-बार न बदलें। बार-बार “disguise” करने की कोशिश से अधिक महत्वपूर्ण आम तौर पर long-term stability होती है।
यह स्पष्ट करना जरूरी है कि यहां बात advertising teams या agencies द्वारा अलग brands, clients और markets के लिए नियमों के अनुरूप independent ad accounts बनाकर उन्हें अलग-अलग operate करने की है — यह Meta Business ecosystem द्वारा अनुमति प्राप्त organizational model है — न कि किसी individual द्वारा platform rules से बचने के लिए “account warming” करने की। Multiple accounts चलाने और उन्हें organize करने का तरीका हमेशा Meta के business conduct rules के अनुसार होना चाहिए, real entities का उपयोग करना चाहिए और business activity को सच-सच declare करना चाहिए।
PurpleMark के साथ कई ad accounts का compliant management
“एक account, एक isolated environment” को वास्तव में लागू करने के लिए manually बहुत सारे Chrome profiles बनाना practical नहीं है। PurpleMark इसी तरह के multi-account environment management और team collaboration के लिए बनाया गया है। इसके web workspace में browser environments centrally create और manage किए जा सकते हैं, अलग business accounts के लिए proxy, Cookies, startup pages और browser fingerprint parameters configure किए जा सकते हैं, और grouping, sharing, transfer, member permissions, operation logs, window synchronization, RPA आदि से daily operations organize किए जा सकते हैं। कई BM, ad accounts और regional campaigns चलाने वाली teams के लिए PurpleMark एक comprehensive multi-account workspace solution की तरह काम करता है:
- Independent environments: हर browser environment के अपने fingerprint parameters होते हैं और उसे fixed proxy IP से bind किया जा सकता है, जिससे अलग-अलग Meta ad accounts isolated रहते हैं और environment-linkage risk कम होता है।
- Grouped management: environments को brand, client, country, BM या ad account के अनुसार classify किया जा सकता है, जिससे search और switching अधिक efficient होती है। Multiple accounts बार-बार login/logout किए बिना एक साथ online रह सकते हैं।
- Team collaboration और permissions: members, roles, authorized groups, sharing, transfer और operation logs से साफ दिखता है कि “कौन कौन-से environments access कर सकता है और किसने क्या किया।” इससे passwords को बार-बार share करने की जरूरत कम होती है और responsibility स्पष्ट रहती है, इसलिए यह agencies और multi-person operations teams के लिए उपयुक्त है।
- Automation: window synchronization या RPA के साथ environments को batch में खोलना, login करना, creatives upload करना और ads initialize करना जैसे repetitive workflows automate किए जा सकते हैं, जिससे manual effort कम होता है।
Compliance note: PurpleMark केवल legitimate businesses और agency teams को उन independent business और advertising accounts को efficiently isolate और manage करने में मदद करने के लिए है जिन्हें वे कानूनी रूप से own या operate करते हैं। Meta requirements के अनुसार real entities से accounts register करें, advertising activity को सच-सच declare करें और platform review या rules को bypass करने के लिए किसी method का उपयोग न करें।
अक्सर पूछे जाने वाले सवाल
Meta Ads Manager में कैसे जाएं?
आधिकारिक address adsmanager.facebook.com है। पहली बार उपयोग करने के लिए Facebook account में login करके Meta Business और ad account बनाना होगा। Existing account होने पर login के बाद सीधे ads create, budget manage और data view किया जा सकता है।
क्या Ads Manager free है? हां। Ads Manager बनाना और उपयोग करना स्वयं free है। Charges केवल तब आते हैं जब ads चलने लगते हैं और actual ad spend होता है। इसलिए तुरंत advertising plan न होने पर भी interface पहले से समझा जा सकता है।
क्या website के बिना Meta Ads चला सकते हैं? हां। Ads users को सीधे Facebook Page, Instagram profile, Messenger या WhatsApp पर भेज सकते हैं, या Meta के built-in Lead Ads forms से information collect कर सकते हैं। हालांकि e-commerce sales या long-term customer development लक्ष्य हो तो independent website data tracking, brand building और performance optimization के लिए अधिक उपयोगी होती है।


